Bu Blogda Ara

28 Kasım 2018 Çarşamba

Zyxel P-600 modemi Access Point olarak kullanmak

Arızalı olduğunu bildiğim fakat arızanın neresinde olduğunu anımsamadığım bir modemi wifi büroya wifi AP kazandırmak için ayarlamak istedim. Biraz araştırdım tabii... Bir arkadaşın da yönlendirmesiyle işlem şu şekilde gerçekleşti.

- Modem web arayüzünden wifi ayarlarını yapıyoru (şifre, kanal v.s.)
- DHCP sunucusunu pasif hale getiriyoruz.
- en son olarak modemin WAN ayarlarından çalışma modunu "Bridge" olarak ayarlıyoruz.

Bende çalışıyor gibi göründü ama sıklıkla wifi bağlantısında kopmalar yaşıyorum. Belki modemin arızasından olabilir. Sağlam bir modelle de denersem yazarım.

5 Kasım 2018 Pazartesi

Virtualbox diskimi 100GBa çıkarmak için yazmam gereken komut

Virtualbox diskimi 100GBa çıkarmak için yazmam gereken komut. Bunun çalışması için anlık görüntüsü olmaması gerekiyor diskin. Buyurun;


C:\Users\nejatumutguner\VirtualBox VMs\7 Kopyası>vboxmanage modifymedium disk "7
 Kopyası-disk1.vdi" --resize 100000

18 Ekim 2018 Perşembe

How to force Microsoft Excel to open files in new window [How-To Guide]

HOW TO FORCE MICROSOFT EXCEL TO OPEN FILES IN NEW WINDOW

To force Microsoft Excel to open files in new window, you must do a registry tweak. This tweak takes less than five minutes, works on any computer (Windows XP, Vista, Win7, etc.) with Microsoft Office 2003 and higher (e.g. Office 2007, 2010, etc.), and is very easy to do; plus I have provided screenshots to help you, so don’t be scared that you have to modify the registry to do this. Take note, however, a) You need administrator access to your computer otherwise you won’t be able to modify the registry and b) You should be very careful when you have the registry editor open — accidental changes could crash your computer.
This tweak works with all Excel files, including files you open yourself and files that programs open via Excel.
To make Excel open spreadsheets in new windows, do the following:
  • Close Excel, if it is open.
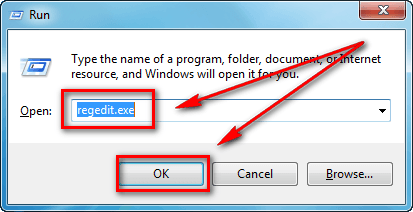
  • Press Win + R on your keyboard, type regedit.exe in the Run box that pops up, and hit OK:
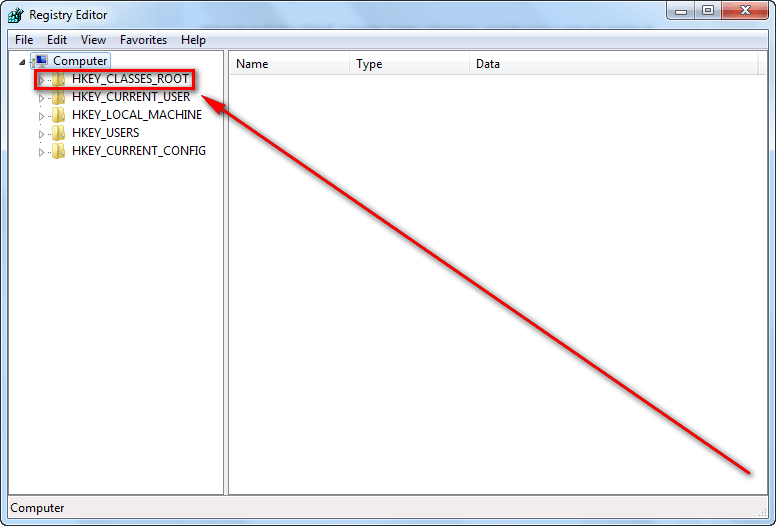
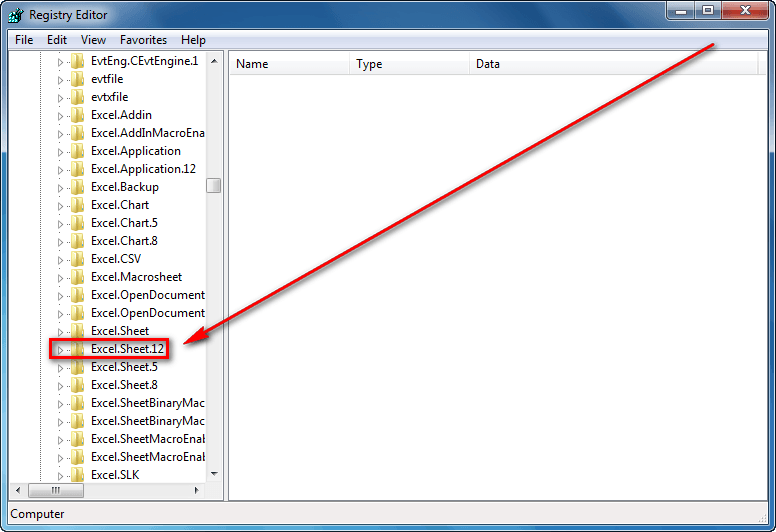
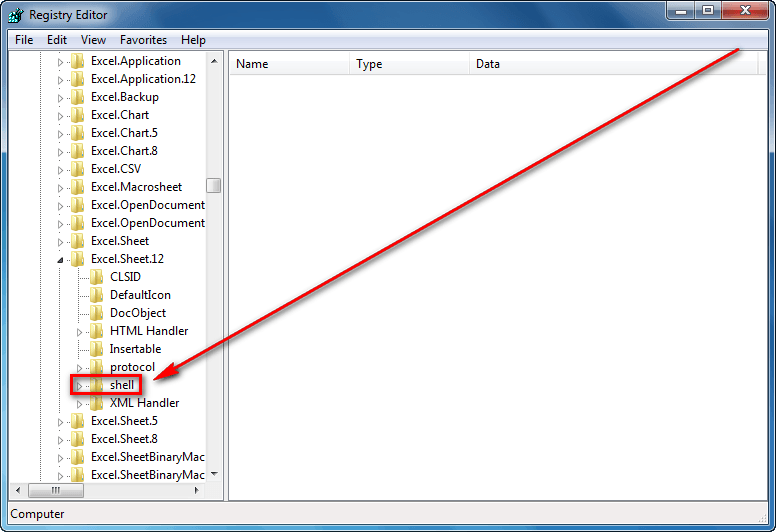
  • Once you hit OK the registry editor will open. Navigate to the HKEY_CLASSES_ROOT/Excel.Sheet.12/shell/Open/command folder:
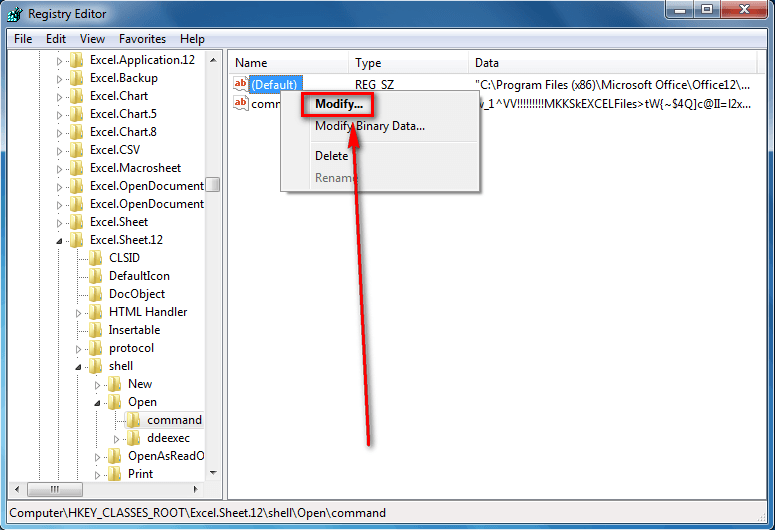
  • From the HKEY_CLASSES_ROOT/Excel.Sheet.12/shell/Open/command folder right-click on the (Default) registry entry and select Modify…:
  • Add a “%1” to the end of the Value data textbox:
Make sure you include the quotes and make sure you have a space between the /e and the “%1”. Do not modify anything else. Click OK when you have finished.
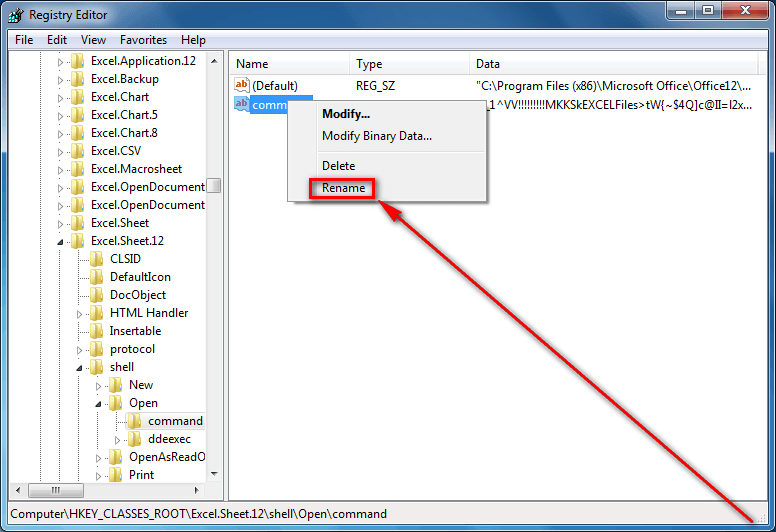
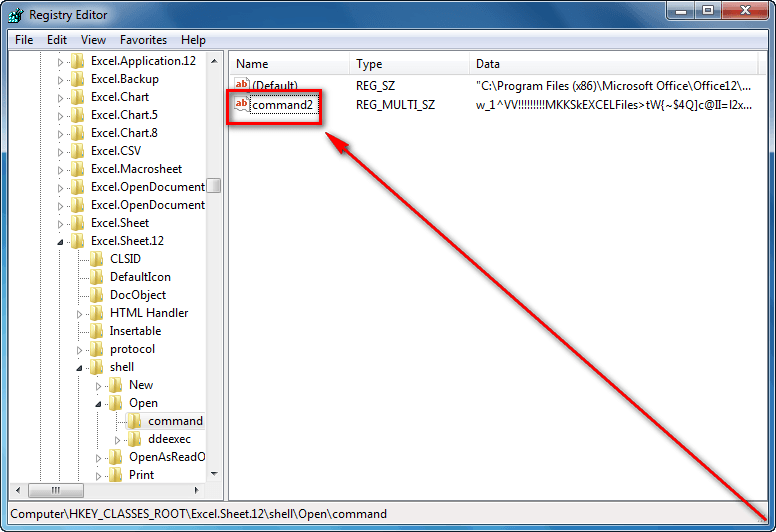
  • Now right-click the command registry entry (this is from the same HKEY_CLASSES_ROOT/Excel.Sheet.12/shell/Open/command folder), select Rename, and rename it to command2:
Ensure you rename the command registry entry and not the command folder.
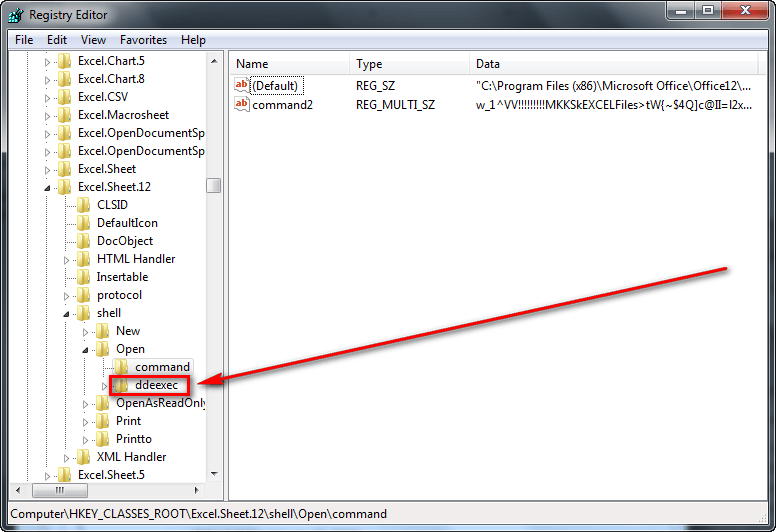
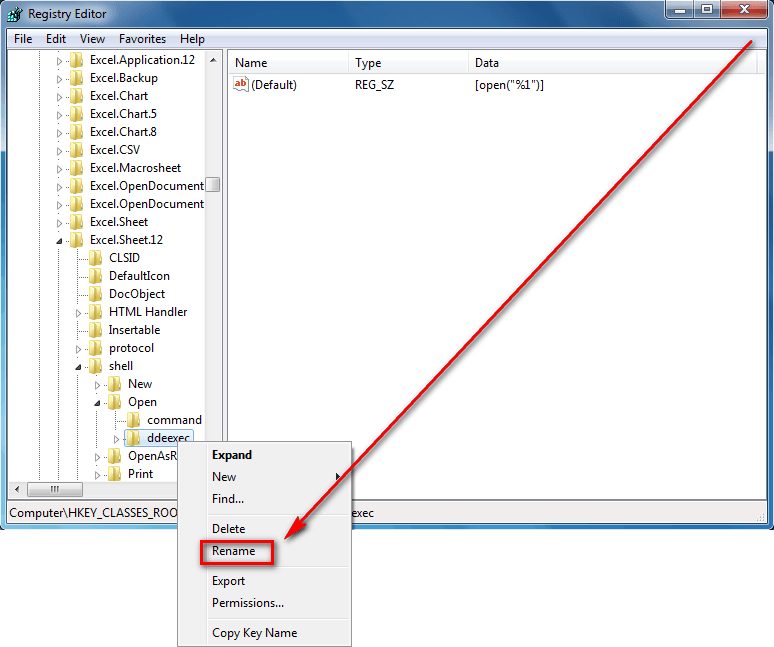
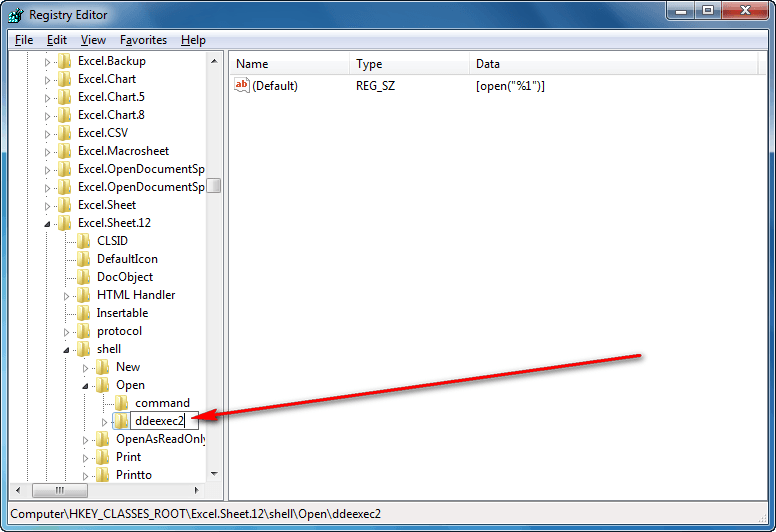
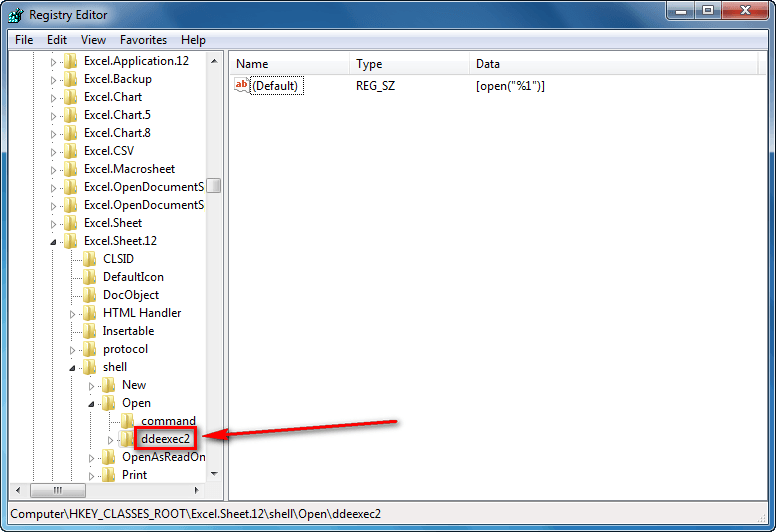
  • Next right-click the ddeexec folder (HKEY_CLASSES_ROOT/Excel.Sheet.12/shell/Open/ddeexec), select Rename, and rename it to ddeexec2:
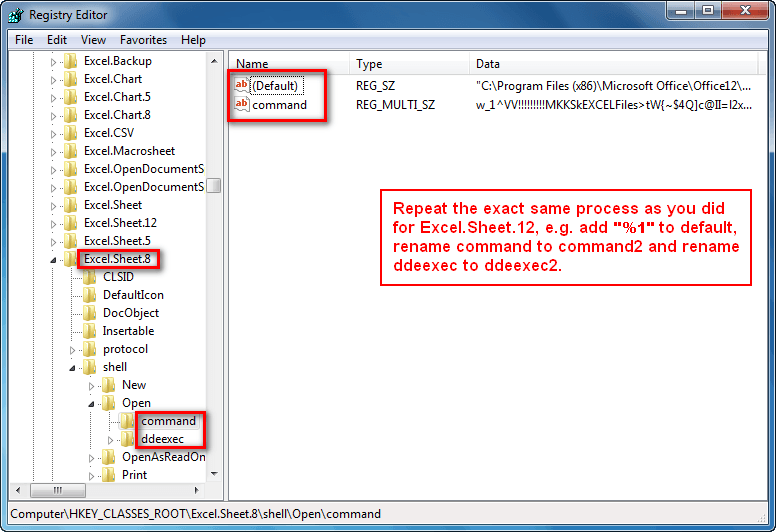
  • Now go to the Excel.Sheet.8 folder (HKEY_CLASSES_ROOT/Excel.Sheet.8) and repeat the same steps as mentioned above. In other words, add a “%1” to the (Default) registry entry from HKEY_CLASSES_ROOT/Excel.Sheet.8/shell/Open/command, rename the command registry entry to command2 from HKEY_CLASSES_ROOT/Excel.Sheet.8/shell/Open/command, and rename the ddeexec folder (HKEY_CLASSES_ROOT/Excel.Sheet.8/shell/Open/ddeexec) to ddeexec2:
  • Close the registry editor (click the X button).
  • Done.
Keep in mind, if you ever update Microsoft Office or apply a patch, you will need to repeat these steps because updates override the registry changes you just made.

CONCLUSION

I really hope Microsoft adds an option within Excel in future versions to open files in new windows; but until they do, this registry tweak allows you to easily and quickly force Excel to open all files in new windows. Enjoy.

Kaynak: https://dottech.org/26491/how-to-force-microsoft-excel-to-open-files-in-new-window-how-to-guide/
Erişim: 18.10.2018 17:55

2 Mayıs 2018 Çarşamba

Basit bir PHP yetkilendirme tekniği


http://www.developerdrive.com/2013/05/adding-a-simple-authentication-using-php-require-and-includes/

3 Aralık 2017 Pazar

How to Create a Bootable USB Drive Without Using Any Software

How to Create a Bootable USB Drive Without Using Any Software

by in computers

Introduction: How to Create a Bootable USB Drive Without Using Any Software


To create a bootable USB drive manually, we will use the Command Prompt as a Windows default program. Here are step by step to create a bootable USB drive as the Windows installation media. To create a bootable USB drive as a Windows installation media, we require at least 4 GB for minimum capacity. Larger capacity is better. At this moment, I use the USB flash drive with 2 GB of capacity as just an example. It's due to some reasons that my 4 GB flash drive encountered an unusual problem that i have to fix later. :D

Step 1: Using DISKPART Command

  1. Insert your USB flash drive to your running computer. As the first step, we need to run Command Prompt as administrator. To do this, we need to find cmd by typing 'cmd' in the search box on Windows Start Menu. After search result for 'cmd' appears, right click on it and select "Run as administrator".
  2. Type 'diskpart' on Command Prompt (without quotes) and hit Enter. Wait for a while until the DISKPART program run.
  3. Type 'list disk' to view active disks on your computer and hit Enter. There would be seen that the active disks shown as Disk 0 for hard drive and Disk 1 for your USB flashdrive with its total capacity.
  4. Type 'select disk 1' to determine that disk 1 would be processed in the next step then hit Enter.
  5. Type 'clean' and hit Enter to remove all of data in the drive.
  6. Type 'create partition primary' and hit Enter. Creating a primary partition and further recognized by Windows as 'partition 1'.
  7. Type 'select partition 1' an hit Enter. Choosing the 'partition 1' for setting up it as an active partition.
  8. Type 'active' and hit Enter. Activating current partition.
  9. Type 'format fs=ntfs quick' and hit Enter. Formatting current partition as NTFS file system quickly.
  10. Type 'exit' and hit Enter. Leaving DISKPART program but don't close the Command Prompt instead. We would still need it for next process.

Step 2: Creating Boot Sector

Let us assume that the flash / USB drive is the D: drive and the DVD installer located on drive F :. The first step, we will navigate Command Prompt to set installation DVD as its active directory.
  1. By default, Command Prompt's active directory for Administrator permission is on C:\Windows\System32>. We will navigate Command Prompt to set on DVD (F:) as its active directory. Just type 'f:' then hit Enter, and the active directory changed to F:.
  2. Type 'cd boot' and hit Enter. Active directory changed to F:\boot>.
  3. Type 'bootsect /nt60 d:' and hit Enter. Creating boot sector on D: drive (USB flash drive).
  4. Type 'exit' and hit Enter to close the Command Prompt. Until this step we have made a bootable USB drive sucessfully, and the flash drive is ready to be used as a boot media.

Step 3: Copying Installation Files

To install Windows from a bootable USB drive, we just need to copy the whole installation files contained on the DVD installer to flash drive. To do this, open the Command Prompt as in previous steps. Once it opens, type 'xcopy f: \ *. * d: \ / E / H / F' and then press Enter. Wait until all the files in the DVD installer copied to the flash drive. Now bootable USB drive is ready to be used for installing Windows from flash drive and you're done !

Kaynak: http://www.instructables.com/id/How-to-Create-a-Bootable-USB-Drive-Without-Using-A/

17 Kasım 2017 Cuma

logo ÇALIŞTIĞINIZ TERMİNAL KAYITLI DEĞİLDİR hatası


Herşeye rağmen hatayı alıyorsanız son çözüm yolu bu olabilir.

(Hasgül ÖZLÜ tarafından yazıldı. )
 
Hata alınan terminalde
Başlat / Çalıştır / Regedit\HKEY_CURRENT_USER / Software / LBS / ERP Kataloğu silinmeli.
Programa girerken ;
Client Task Number : 0 yapılmalı.

28 Haziran 2017 Çarşamba

Mediatomb'da türkçe karakter sorununun çözümü

Mediatomb basit ve etkili bir UPnP / DLNA sunucu. Kurulum aşamalarını hatırlamıyorum, belki sonra tekrar kurmak zorunda kalırsam onu da yazarım. Bir şekilde kurmuştum aylar önce fakat etkin kullanmaya şimdi başladım. Başlar başlamaz da sunduğu medyaların dosya isimlerini gerek web arayüzünde gerekse getirdiği medya listelerinde düzgün göstermediğini gördüm. Biraz araştırdıktan sonra çözümü buldum. Buyurun...

Multilingual Karakter Desteği

Mediatomb'da Multilingual karakterler aşağıdaki ayarlamalar sayesinde kullanılabilir:
/etc/mediatomb/config.xml dosyasını açıp içerisine aşağıdaki eklemeleri yapıyoruz. Muhtemelen mavi ile işaretli kısımlar dosyada olmayacak, onları ekliyoruz.

 <import hidden-files="no">
    <filesystem-charset>UTF-8</filesystem-charset>
    <metadata-charset>UTF-8</metadata-charset>
    <playlist-charset>UTF-8</playlist-charset>
    <scripting script-charset=”UTF-8″>
Konfigürasyon dosyasını değiştirdikten sonra MediaTomb'u (servis) yeniden başlatıyoruz. Sonrasında web arayüzünden önceden indekslenmiş dosya ve klasörleri kaldırıp düzgün dosya isimlerini görebilmek için yeniden ekliyoruz. Hepsi bu.